 |
 |
 |
 |
PRODUCT DESCRIPTION:
4 HP motor of 120 V AC motor is fitted to operate the gate opener. Due to its continuous driving capacity and exceptional way to run the gate opener performance increases. The motor capacity can handle up to 5,700 lbs and needs extra chain if the height of the gate exceeds from 100 ft length. The 20 ft gate chain is included. If your gates are more than 20 ft in length then you can purchase an extra chain in "
Chains" section).
FEATURES:
- Opens gates weighing up to 5700 lbs and up to 100 ft in length
- Built in Radio receiver
- Supports up to 6 Remotes, with 2 included in the kit
- Supports up to 100 Remotes with LM 138 (optional, not included)
- User programmable and user erasable remote codes
- RF hopping code technology prevents your remote code being accessible to others
- Auto-Close Feature
- Power Supply: AC 120V
- Operating Time: 0 - 44 seconds
- For your safety, this model will stop and reverse if is encounters an obstruction on closing and stop when it encounters an obstruction on opening
- Manual key release design for emergency purposes
- Pedestrian mode
- Single Phase Motor


Gate Operator for Sliding Driveway Gate
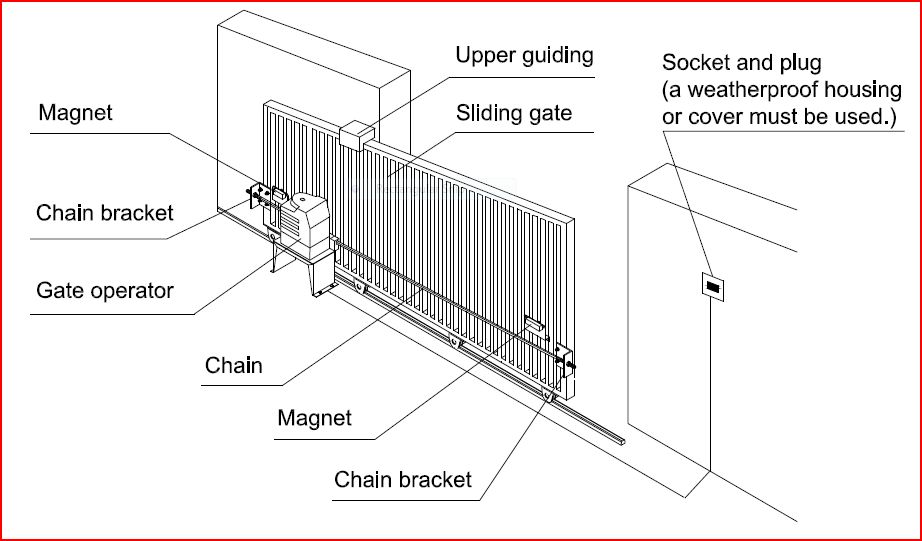
ALEKO® AC5700 Heavy-Duty Sliding Gate Opener. How it works.
- - Power supply AC 110V60Hz
- - Opening Gate Speed 12m/min
- - Output torque = 25 Nm
- - Motor speed 1400 rpm
- - Type Limit switches: Magnetic limit switch
- - Remote control distance = 100 Ft (30 m)
- - Weight 60 lb; - Noise <56 dB
- - Environmental temp -13°F ~ 150°F (-25°C ~ +65°C)
- - Max gate weight 5700 lb or 2500 kg
- - Output shaft 2 1/4" (58.5 mm)
- - Output power of motor 1000W
|
|
 |
 |
 |
 |
 |
 |
 |
 |
 |
 |
 |
PACKAGE INCLUDES:
- - 1 (One) Sliding Gate Opener Unit
- - 1 (One) Set of 20 Ft Chain
- - 1 (One) Mounting metal base
- - 2 (Two) 433MHz remotes LM122
- - 1 (One) Keypad LM172, wireless
- - 1 (One) Keypad metal cover
- - 1 (One) Push button LM147, wired
- - 1 (One) Set of Photocell LM102, wired
- - 1 (One) Set of accessories and mounting hardware for easy installation
- - 1 (One) Manual with step by step installation instructions
|
|
 |
 |
 |
 |

|


